Hey, dairy free or not, these brownies are delicious. Fortunately, most brownie recipes are dairy free, but if you are needing to avoid milk or butter, brownies can be risky as some recipes will use melted butter for the oil.
My daughter calls these The Best Brownies.
1/2 cup vegetable oil
1 cup sugar
1 tsp vanilla extract
2 large eggs
1/4 tsp baking powder
1/3 cup cocoa powder
1/2 tsp salt
1/2 cup flour
Preheat oven to 350
Mix together sugar, eggs, oil, and vanilla. Stir until blended.
Stir dry ingredients in a separate bowl Stir into the wet ingredients.
Pour into greased 9x9 square pan. Bake for 20 minutes or until sides start to pull away from the pan.
Cool completely before cutting. (Hahahaha ...riiight. That is hilarious)

Tuesday, February 16, 2016
SMOOTHIE Mango Peach
This recipe will serve two.
1-1/2 cups soy milk
1-1/2 cups frozen peaches
1 cup frozen chopped mango
2 Tbsp honey
1/2 tsp vanilla
1 cup ice
Pulse soy milk, peaches, mango, honey and vanilla in blender until combined. Add ice and blend until smooth.
(Remember not to put the honey in it if serving to young children)
1-1/2 cups soy milk
1-1/2 cups frozen peaches
1 cup frozen chopped mango
2 Tbsp honey
1/2 tsp vanilla
1 cup ice
Pulse soy milk, peaches, mango, honey and vanilla in blender until combined. Add ice and blend until smooth.
(Remember not to put the honey in it if serving to young children)
Monday, August 03, 2015
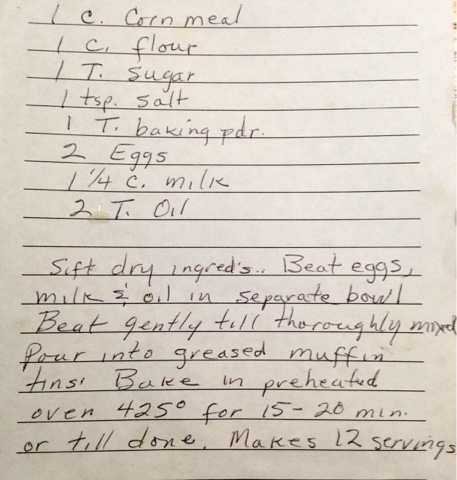


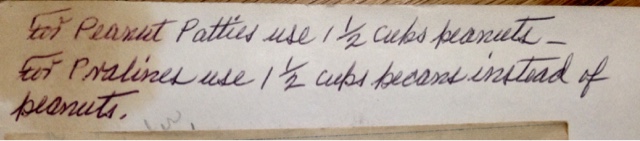


My Grandmother's Recipe - No Title
Why yes, I DO come from a long line of messy cooks apparently! lol!


Friday, January 16, 2015
Dairy Free Chocolate Oatmeal No Bake Cookies
I tweaked this recipe from one that contained dairy. I like this recipe because it is free of allergens like dairy casein, eggs, and wheat. Unfortunately, it DOES
have peanut butter in it and almond milk -- so it isn't for someone with nut allergy.
2 cups granulated sugar
4 Tbsp unsweetened cocoa powder
1/2 (scant) cup butter substitute (my favorite is Earth Balance original, Do NOT confuse with Smart Balance)
1/2 cup unsweetened almond milk (I like Almond Breeze or Silk Almond Milk)
Bring these ingredients to a rolling boil in a 2-3 quart saucepan. Continue boiling for 1 full minute.
Remove from heat.
Add:
1 cup peanut butter
1 Tbsp vanilla extract
3 cups quick-cooking oatmeal, uncooked
Mix thoroughly but quickly. Drop by teaspoonfuls onto wax paper until cool.
Guard the area to keep them from disappearing...lol!
TIPS THAT WILL DE-STRESS THIS RECIPE!:
Lay out two pieces of wax paper about 12 inches long. Put them on a surface that will cool them faster and not retain heat. For instance, if you have a marble countertop, that will be great under the wax paper but a baking stone will make the cooling process much longer. (AND PEOPLE WANT THEIR DANG COOKIES NOW, DANGIT!)
----------
Measure out the oatmeal into a medium mixing bowl before you start anything else, and set it to the side.
----------
Q: What is the difference between regular original oatmeal oats and "quick cooking" oats? Does it HAVE to be Quick Cook type?
A: Technically, no. The difference will be the texture. Regular oatmeal will give it a chewier texture that isn't as liked (at least by my family). The Quick Cooking 2-minute type oats blend better and give the cookies a better consistency.
----------
Measure the butter substitute using a butter knife to put it into a dry measuring 1/2 cup, then scrape it into the saucepan. Wipe the knife and use it again to measure the peanut butter in the same measuring cup. Set the peanut butter aside until needed.
----------
Let a kid scrape the bowl and lick the spoon, there are no animal products in this recipe so there is no harm in eating it.
-----
Things I've tried & learned while making this recipe several times:
If you have both quick cooking oatmeal and regular, using 1-1/2 cups of each, or whatever makes 3 cups, works ok. They look a little more interesting actually, but the oats are more apparent. So if you have a picky little eater, use your best judgment!
Using a full 1/2 cup of butter substitute makes the cookies a bit too oily. Put in slightly less. I said "scant" - I stop filling the measuring cup when the Earth Balance is about 1/2" from the top of the measuring cup.
Wow, 2 cups is a LOT of sugar, eh? Yes, It is tempting to decrease the sugar. Two cups IS a lot...but this recipe NEEDS the sugar, because the cookie it is basically a candy, similar to pralines. That's why the mixture has to boil for an entire minute.
Use a timer for that minute, don't scrimp on it to save time or the cookies won't set well. For similar reason, I doubt an alternate sweetener like Splenda would work (but I have not tried that yet, sorry)
I thought about decreasing the sugar and adding raisins. Decided not to try it, again because it really needs melted refined sugar to set the cookies. If you try it, leave a comment and let us know how it turned out!
I've tried making these into bar cookies by pressing the mixture into an 8"x8" square pan. I thought it would save time. I'd just let it cool & then cut them into squares, right? Not. Tearing up a concrete sidewalk with a jackhammer would be easier. I still think there might be some way to modify it into a bar cookie crust, perhaps by decreasing the amount of dry oatmeal. What kind of bar cookie? I'm thinking perhaps brownie on top of this. Brownies are another recipe I've successfully converted to dairy free, and I will share the dairy free brownie recipe soon.
When the cookies are partly cooled, it was tempting to roll some into balls. I thought they might look prettier. They did look neater, but they lost their shiny finish and didn't look as tasty. It also altered the texture to a bit dry & granular.
Speaking of dry and granular, that is also what will happen if you cut down on the peanut butter. I use creamy peanut butter. I don't see why one couldn't use crunchy peanut butter, but keep inind that a 1/2 of crunchy peanut butter will not equal a 1/2 cup of creamy, as the amount of creamy has been displaced by the nut pieces. So increase a bit for crunchy. I have a feeling it would be a good texture in the cookie.
If you have a Tablespoon sized cookie scoop, that will make laying the cookies out much quicker. Speed is important because the mixture will begin to cool and dry right away. When you're not ready, they'll dry quickly. When you're hungry for cookies and you can't wait to eat some, these seem to take FOREVER to be ready. This is the Law Of Cookies, probably on page 666 of any cookbook.
I've also put leftover sweetened shredded coconut and almond slivers in the mixture (different times)
So as you can see, this recipe lends itself to some experimentation pretty well. Just keep in mind it needs all that sugar setting up (firming), and the peanut butter helps the texture to be smoother and not as rough.
Once it's all cool, put into an airtight container. I've rarely seen them in a container at my house though, they get gobbled up very fast!
Friday, January 11, 2013
Old cookbooks you can read online
This is very interesting! Ever want to learn to cook the old way? Here is a collection of very old, many antique, cook books you can access online.
http://digital.lib.msu.edu/projects/cookbooks/html/browse.html
Sunday, December 09, 2012
Impossibly Easy Mini Cheeseburger Pies
A couple days ago, I received a calendar from the nice folks at Betty Crocker. I joked on my personal Facebook page and called them "the sadists at Betty Crocker," after I did this recipe...but I swear I was just kidding.
Yes this is easy but not "impossibly easy." I don't know where they got that idea. It would be kind of complicated for a beginning cook, if only for the number of bowls, spoons, measuring cups, frying pans, muffin tins, etc that are used in the recipe. It is not a terribly hard recipe, but there is going to be more cleaning up than there is for an average recipe.
Also for future reference, Betty Crocker...put some COUPONS in the calendar! Please, please please. We love coupons.
Ok, here is the recipe. My notes in blue.
Burger Mixture:
1 lb lean (at least 80%) ground beef
1 large onion, chopped (1 cup)
1 TBSP Worcestershire sauce
1 tsp garlic salt
1 cup shredded cheddar cheese (4 oz)
Baking Mixture
1/2 c milk
1/2 cup Original Bisquick mix
2 eggs
Garnishes, if desired
12 mini kosher dill pickles
1 medium tomato, chopped
ketchup and mustard
1. Heat oven to 375 F. Spray 12 regular size muffin cups with cooking spray.
Don't be clever like I was and try to use paper cupcake liners...the mixture stuck impossibly to the paper. Don't second guess recipes. Just do what they say and trust them. Learn from my fail.
2. In 10-inch skillet, cook beef and onion over medium high heat 5 to 7 minutes, stirring frequently, until thoroughly cooked; drain. Cool for 5 minutes; stir in Worcestershire sauce, garlic salt and cheese.
I know that Worcestershire sauce tends to be expensive...DO buy Lea & Perrin's Worcestershire sauce -- it's worth it. I've tried the store brands and they are just not as tasty and it makes a worthwhile difference.
3. In medium bowl, stir baking mixture ingredients with a whisk or fork until blended. Spoon 1 scant tablespoon baking mixture into each muffin cup. Top with about 1/4 cup burger mixture. Spoon 1 tablespoon baking mixture onto burger mixture in each muffin cup.
I used measuring scoops for these tasks.
4. Bake about 30 minutes or until toothpick inserted in center comes out clean, and muffin tops are golden brown. Cook 5 minutes. With think knife, loosen sides of muffins from pan; remove from pan and place top side up on cooling rack. Cool 10 minutes longer, and serve with garnishes.
Family verdict -- 1 daughter liked them, ate 2 of them. 2 sons and 1 daughter would not even taste it. I think for the young ones, it was my use of the paper liners -- that made them think CAKE, and having ground beef and cheese in something that you traditionally think of as holding CAKE is a big turn off.
Idea: I think these would be fun done with sausage and in a smaller size, like the mini muffins, as a side dish for a brunch/buffet type event.
 |
Also for future reference, Betty Crocker...put some COUPONS in the calendar! Please, please please. We love coupons.
Ok, here is the recipe. My notes in blue.
Burger Mixture:
1 lb lean (at least 80%) ground beef
1 large onion, chopped (1 cup)
1 TBSP Worcestershire sauce
1 tsp garlic salt
1 cup shredded cheddar cheese (4 oz)
Baking Mixture
1/2 c milk
1/2 cup Original Bisquick mix
2 eggs
Garnishes, if desired
12 mini kosher dill pickles
1 medium tomato, chopped
ketchup and mustard
1. Heat oven to 375 F. Spray 12 regular size muffin cups with cooking spray.
Don't be clever like I was and try to use paper cupcake liners...the mixture stuck impossibly to the paper. Don't second guess recipes. Just do what they say and trust them. Learn from my fail.
2. In 10-inch skillet, cook beef and onion over medium high heat 5 to 7 minutes, stirring frequently, until thoroughly cooked; drain. Cool for 5 minutes; stir in Worcestershire sauce, garlic salt and cheese.
I know that Worcestershire sauce tends to be expensive...DO buy Lea & Perrin's Worcestershire sauce -- it's worth it. I've tried the store brands and they are just not as tasty and it makes a worthwhile difference.
3. In medium bowl, stir baking mixture ingredients with a whisk or fork until blended. Spoon 1 scant tablespoon baking mixture into each muffin cup. Top with about 1/4 cup burger mixture. Spoon 1 tablespoon baking mixture onto burger mixture in each muffin cup.
I used measuring scoops for these tasks.
4. Bake about 30 minutes or until toothpick inserted in center comes out clean, and muffin tops are golden brown. Cook 5 minutes. With think knife, loosen sides of muffins from pan; remove from pan and place top side up on cooling rack. Cool 10 minutes longer, and serve with garnishes.
Family verdict -- 1 daughter liked them, ate 2 of them. 2 sons and 1 daughter would not even taste it. I think for the young ones, it was my use of the paper liners -- that made them think CAKE, and having ground beef and cheese in something that you traditionally think of as holding CAKE is a big turn off.
Idea: I think these would be fun done with sausage and in a smaller size, like the mini muffins, as a side dish for a brunch/buffet type event.
Thursday, October 25, 2012
Slow Cooker Pulled Pork
2/3 cup Lea & Perrins Worcestershire sauce
1/2 cup Heinz Tomato Ketchup
1/4 cup firmly packed brown sugar
1/4 cup tomato paste
1 medium white onion, chopped
2 Tbsp yellow mustard
2 Tbsp white vinegar
3-1/2 lb boneless pork shoulder, trimmed and cut into 4 pieces.
In a 6 quart slow cooker like Crock Pot, mix all ingredients except pork. Once combined add pork, turning to cover. Cook in low for 8-10 hours, or until internal temperature of meat reaches 165 degrees.
Remove pork and shred with 2 forks. Return pork to slow cooker and stir unto sauce. To serve, spoon 1/2 cup onto a sandwich bun.
Wednesday, October 24, 2012
Do you shop at Aldi?
If you shop at Aldi or you're thinking about it, you will find my new Squidoo lens interesting. I rate products from Aldi, so you'll know which ones are close to national brand quality and which products my family didn't like and/or we didn't find a good value. After all, we're not really saving money if your family members won't eat it, right?
Now you'll know what's good and what's not. I also share how much I saved on a recent shopping trip there.
What to buy and not buy at Aldi's
Now you'll know what's good and what's not. I also share how much I saved on a recent shopping trip there.
What to buy and not buy at Aldi's
Subscribe to:
Posts (Atom)